Translate

显示标签为“JCB”的博文。显示所有博文

2025年8月29日星期五

This article explains how to adjust the wear pads of the extended bucket of a JCB backhoe loader


Preparing the Cab Frame Aperture

If damp or wet, dry the aperture area using a hot air gun

(sourced locally).

Use 'Active Wipe 205' to thoroughly clean and 'prime'

the trimmed sealant. Use a lint free cloth to apply the

'Active Wipe 205', allow 5 minutes flash off (drying)

time.

Note: Do not use any other type of cleaning fluids, otherwise

they may be absorbed into the old sealant and ultimately

prevent the new glass from bonding.

Direct Glazing (cont'd)

Preparing the New Glass

JCB Electronic Service Tool Diagnostic Kit High Quality

! CAUTION

The laminated front screen must be handled with extra

care to prevent breakage. Wherever possible, store and

handle it in a vertical attitude. When placing or lifting the

screen in a horizontal attitude it must be supported over

its whole area, not just at the edges.

BF 1-8

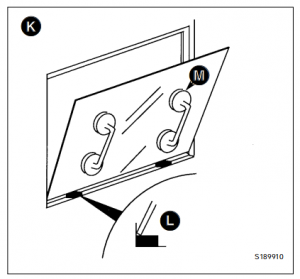
1 Make sure that the new glass correctly fits the frame

aperture K.

a Put two spacer blocks L onto the bottom part of the

frame aperture.

b Install the new glass on the spacer blocks - ALWAYS

USE GLASS LIFTERS M (see Service Tools). Check

that there is an equal sized gap all round the edge of

the glass.

Note: The spacer blocks are rectangular in section to give

two common gap widths. If necessary they can be trimmed

to a smaller size to give an equal sized gap around the glass.

IMPORTANT: The glass edges MUST NOT touch the frame,

otherwise movement of the frame will chip and eventually

break the newly installed glass.

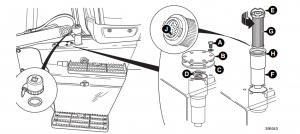
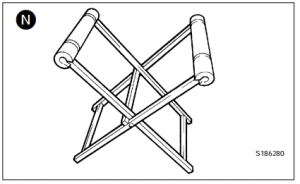
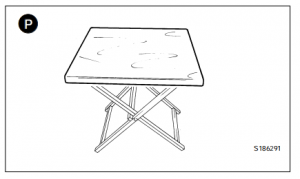
2  After checking for size, remove the new glass and place

it on a purpose made glass stand N (see Service

Tools).

Small panes of glass will need locating on a 600 x 700 mm x

15 to 19 mm thick plywood board P (sourced locally to fit

the glass stand N). It is recommended that an access hole is

cut in the board to accommodate the glass lifter, making it

easier and safer to handle small panes of glass. The board

should be covered with felt or carpet to give an anti-scratch

surface. Resting the glass on four spacer blocks will ensure

clearance of the cartridge nozzle tip during application of the

polyurethane sealant.

3  Make sure the glass is positioned on the stand the

correct way up (i.e. with the black ceramic ink band

upwards) ready for application of primer etc.

4 a Use 'Active Wipe 205' to thoroughly clean and

'prime' the black ceramic ink band printed on the

glass (see Note 1). Use a lint free cloth to apply the

'Active Wipe 205', allow 5 minutes flash off (drying)

time.

Note 1: Do not touch the glass after cleaning with the

'Active Wipe 205'.

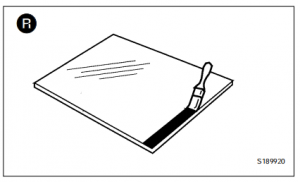
b If the glass does not have a black ceramic ink band,

paint a band on the glass using 'Black Primer 206J'.

The band should be approximately 25mm (1in) wide,

and the edge should be a neat straight line as shown

at R

06.2025 JCB ServiceMaster 4 v25.3.3 Diagnostic Software with SW Files Download and installatiom

Direct Glazing (cont'd)

Preparing the New Glass (cont'd)

5  Install the Ultra Fast Adhesive cartridge (see Sealing

and Retaining Compounds and Note 2 below) into a

suitable applicator gun:

a Remove the aluminium disc cover from the base of

the cartridge and discard the 'dessicant capsule'.

b Make sure that the rolled edge of the cartridge is not

damaged - if necessary, the edges should be

pressed flat, otherwise it will be difficult to remove

the cartridge from the applicator gun.

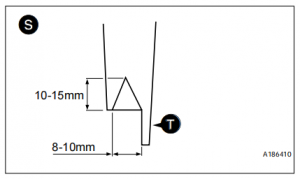
c Pierce the front 'nozzle' end of the cartridge to its

maximum diameter.

d Fit the pre-cut nozzle shown at S.

e Install the cartridge in the applicator gun.

Note 2: Cold material will be very difficult to extrude. The

cartridges must be pre-heated in a special oven (see

Service Tools) for 1 hour to a temperature of 80°C (176°F).

Pre-heating the cartridges makes the adhesive more

workable and also brings the 'curing' time down to 30

minutes.

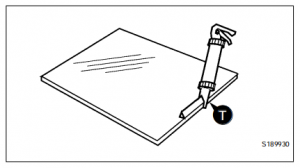
6   Apply the pre-heated adhesive to the glass (do not start

in a corner). Keep the nozzle guide T against the edge

of the glass and make sure that the adhesive forms a

continuous 'pyramid' shape.

Note 3: Once the pre-heated adhesive has been applied to

the glass, install the glass in the aperture as soon as

possible. After approximately 10 minutes the sealant will

form a 'skin', this will prevent the glass from bonding.

7   After applying the adhesive, leave a small amount of

sealant protruding from the nozzle. This will prevent any

adhesive left in the cartridge from 'curing'.

Installing the New Glass

1   Make sure the two spacer blocks are in position (see

step 1 of Preparing the New Glass).

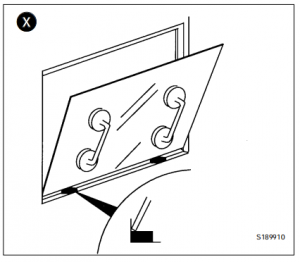
2    Install the glass in the frame aperture:

a ALWAYS use the special lifting tools when moving

the glass. Use a lifting strap to hold large panes of

glass in position as shown W.

b Sit the bottom edge of the glass on the spacer

blocks as shown X.

c Make sure that the glass is correctly positioned, then

gently press around the edges of the glass and

ensure full adhesive contact is achieved. Do not

press too hard or too much adhesive will squeeze

out.

Direct Glazing (cont'd)

Installing the New Glass (cont'd)

3   Make the inside seal smooth:

a Wearing surgical gloves, dip your finger in a soapy

water solution.

b  Use your finger to make the inside seal smooth.

4    All exposed edges must be sealed using Black

Polyurethane Sealant (see Sealing and Retaining

Compounds).

5    Clean the glass after installation:

IMPORTANT: Use extreme caution when wiping the inside

of the new glass - pushing too hard on the inside of the

glass will affect the integrity of the bonded seal.

a Small amounts of sealant can be cleaned from the

glass using the 'Active Wipe 205'.

b Large amounts of excess sealant should be left to

'cure' (see Note 4) and then cut off with a sharp

knife.

Note 4: On completion of the glass replacement procedures,

the sealant 'curing' time is 30 minutes. This means that the

machine can be driven and used after 30 minutes, but it

MUST NOT be used during the curing period of 30 minutes.

c  Clean the glass using a purpose made glass

cleaner.

6   On completion of the glass installation procedures tidy

the work area:

a Remove ALL broken glass from the cab area.

b Remove the protective covers from the cab seat and

control pedestals.

c Renew all 'warning' and 'information' decals so that

the new installation conforms with the original cab

installation.

JCB Agco SISU Power WinEEM4 – JCB Service Tool 2.8.0

2025年8月18日星期一

How to correctly install a glass panel glued to the cab frame hole on a JCB 3CX - 4CX - 214 - 214e - 215 - 217 backhoe loader


How to correctly remove and install a glass panel glued to the cab frame hole on a JCB 3CX - 4CX - 214 - 214e - 215 - 217 backhoe loader

JCB Electronic Service Tool Diagnostic Kit High Quality

The following procedures explain how to correctly remove

and install panes of glass that are directly bonded to the cab

frame apertures. When carrying out the procedures, relevant

safety precautions must be taken:

1 Always wear safety glasses during both removal and    replacement.

2  Use protective gloves - heavy duty leather gauntlet type   gloves when cutting out the broken glass; 'non-slip'

type gloves when handling/moving panes of glass;     surgical type gloves when using the polyurethane   adhesives.

3   Wear protective overalls.

4    DO NOT smoke - the activators and primers used in the  procedures are highly flammable.

5    Do not attempt to handle or move panes of glass   unless you are using glass lifters (see Service Tools)


Removing the Broken Glass and Old Sealant

Several special tools are required to successfully complete

the removal and replacement procedures. Reference is

made to the tools in the text. The majority of these tools can

be obtained locally and the remainder from JCB Service

(see Service Tools).

The work must only be carried out in a dry, frost free

environment. A protective canopy may be required or the

machine/frame must be moved to a sheltered area. In damp

or wet conditions, hinged doors and window frames can be

removed from the machine and taken to a more suitable

(dry) environment.

Glass should not be replaced at temperatures below 5°C

(41°F)


Note: The front screen glass is laminated, the other glass is

toughened. If a laminated pane breaks it will stay in one

piece even though the glass is cracked. A toughened pane

will shatter and fall apart. The method of removal of the

glass depends upon which type it is. See WARNING below.


! WARNING

Always wear safety glasses when removing or installing

screen glass. Never use a power operated knife when

removing the sealant around a toughened glass screen.

The action of the knife could cause particles of glass to

be thrown with sufficient force to cause serious injury,

even when safety glasses are being worn. Use only hand

operated tools when working with toughened glass.

Removing the Broken Glass and Old Sealant (cont'd)

1

Position the machine on level ground and apply the

parking brake. Stop the engine. Put protective covers

over the cab seat and control pedestals.

2

a  Laminated glass - leave installed until the old

sealant has been cut away, after which it will be

possible to lift the broken screen away from its

frame housing in one piece.

Toughened glass - remove as much of the

shattered glass as possible prior to cutting out the

old sealant.

3  Cut out the old sealant, leaving approximately 1 to 2

mm on the cab frame. There are several tools and

techniques for doing this:

a

Pneumatic Knife A provides one of the easiest

methods of removing the sealant around laminated

glass. The tool, powered by compressed air,

should be sourced locally.

Note: This tool must not be used on toughened glass (see

WARNING on previous page).

1 Press the handle to start the knife blade oscillating.

2 Insert the knife blade into the sealant.

3 Slowly move the knife along the sealant with the

blade positioned as close to the glass as possible.

Do not allow the knife blade to overheat or the

sealant will melt.


06.2025 JCB ServiceMaster 4 v25.3.3 Diagnostic Software with SW Files Download and installatiom

b  Braided Cutting Wire and Handles B. This method

uses a 3-core wire, a wire starter tube and two

handles (see Service Tools).

1 Insert the steel tube C into the old sealant on the

inside of the glass.

2   Insert the braided cutting wire D down the centre of

the steel tube. If necessary, from the outside, cut

out local sealant at the point of the tube to gain

access to the wire.

3 Using suitable pliers, pull the cutting wire through

the sealant to the outer side of the glass.

4  Secure each end of the braided cutting wire in the

special handles E.


5

Move the cutting wire backwards and forwards in a

sawing motion and at the same time gently push or

pull the wire to cut through the old sealant.


Direct Glazing (cont'd)

Removing the Broken Glass and Old Sealant (cont'd)

c Cut-out Knife F. The cut-out knife can be used as a

left handed or right handed tool. For the knife and its

replaceable blades, refer to Service Tools.

(i) Insert the knife blade into the sealant.

(ii) Make sure that the blade of the knife is against

the glass as shown at G.

(iii) Use the 'pull-handle' to pull the knife along and

cut out the old sealant.

d

Craft Knife H. The blades are replaceable.

(i) Insert the knife blade into the sealant.

(ii) Pull the knife along and cut out the old sealant.

Note: There are other tools available to cut out the old

sealant. For example, there is a long handle type craft knife

to give extended reach. Refer to Service Tools, for details of

this and any other tools.

4  a Laminated glass - lift out the broken pane using

glass lifters (see Service Tools).

b Toughened glass - remove the cut off sealant and all

remaining particles of shattered glass.

5  If necessary, trim off the remaining old sealant to leave

approximately 1 to 2 mm on the upright face of the cab

frame aperture, as shown at J.

Apply a coat of 'Black Primer 206J' to the paintwork if:

a Paintwork was damaged or scratched during the

glass/sealant removal procedures.

b The old sealant was inadvertently cut back to the

cab frame during the glass/sealant removal

procedures.

Preparing the Cab Frame Aperture

1  If damp or wet, dry the aperture area using a hot air gun

(sourced locally).

2  Use 'Active Wipe 205' to thoroughly clean and 'prime'

the trimmed sealant. Use a lint free cloth to apply the

'Active Wipe 205', allow 5 minutes flash off (drying)

time.

Note: Do not use any other type of cleaning fluids, otherwise

they may be absorbed into the old sealant and ultimately

prevent the new glass from bonding.


JCB Agco SISU Power WinEEM4 – JCB Service Tool 2.8.0

2025年8月15日星期五

How to properly remove the old bonded glass panel from the backhoe loader cab frame hole


How to correctly remove and install a glass panel glued to the cab frame hole on a JCB 3CX - 4CX - 214 - 214e - 215 - 217 backhoe loader

JCB Electronic Service Tool Diagnostic Kit High Quality

The following procedures explain how to correctly remove

and install panes of glass that are directly bonded to the cab

frame apertures. When carrying out the procedures, relevant

safety precautions must be taken:

1 Always wear safety glasses during both removal and    replacement.

2  Use protective gloves - heavy duty leather gauntlet type   gloves when cutting out the broken glass; 'non-slip'

type gloves when handling/moving panes of glass;     surgical type gloves when using the polyurethane   adhesives.

3   Wear protective overalls.

4    DO NOT smoke - the activators and primers used in the  procedures are highly flammable.

5    Do not attempt to handle or move panes of glass   unless you are using glass lifters (see Service Tools)


Removing the Broken Glass and Old Sealant

Several special tools are required to successfully complete

the removal and replacement procedures. Reference is

made to the tools in the text. The majority of these tools can

be obtained locally and the remainder from JCB Service

(see Service Tools).

The work must only be carried out in a dry, frost free

environment. A protective canopy may be required or the

machine/frame must be moved to a sheltered area. In damp

or wet conditions, hinged doors and window frames can be

removed from the machine and taken to a more suitable

(dry) environment.

Glass should not be replaced at temperatures below 5°C

(41°F)


Note: The front screen glass is laminated, the other glass is

toughened. If a laminated pane breaks it will stay in one

piece even though the glass is cracked. A toughened pane

will shatter and fall apart. The method of removal of the

glass depends upon which type it is. See WARNING below.


! WARNING

Always wear safety glasses when removing or installing

screen glass. Never use a power operated knife when

removing the sealant around a toughened glass screen.

The action of the knife could cause particles of glass to

be thrown with sufficient force to cause serious injury,

even when safety glasses are being worn. Use only hand

operated tools when working with toughened glass.

Removing the Broken Glass and Old Sealant (cont'd)

1

Position the machine on level ground and apply the

parking brake. Stop the engine. Put protective covers

over the cab seat and control pedestals.

2

a  Laminated glass - leave installed until the old

sealant has been cut away, after which it will be

possible to lift the broken screen away from its

frame housing in one piece.

Toughened glass - remove as much of the

shattered glass as possible prior to cutting out the

old sealant.

3  Cut out the old sealant, leaving approximately 1 to 2

mm on the cab frame. There are several tools and

techniques for doing this:

a

Pneumatic Knife A provides one of the easiest

methods of removing the sealant around laminated

glass. The tool, powered by compressed air,

should be sourced locally.

Note: This tool must not be used on toughened glass (see

WARNING on previous page).

1 Press the handle to start the knife blade oscillating.

2 Insert the knife blade into the sealant.

3 Slowly move the knife along the sealant with the

blade positioned as close to the glass as possible.

Do not allow the knife blade to overheat or the

sealant will melt.


06.2025 JCB ServiceMaster 4 v25.3.3 Diagnostic Software with SW Files Download and installatiom

b  Braided Cutting Wire and Handles B. This method

uses a 3-core wire, a wire starter tube and two

handles (see Service Tools).

1 Insert the steel tube C into the old sealant on the

inside of the glass.

2   Insert the braided cutting wire D down the centre of

the steel tube. If necessary, from the outside, cut

out local sealant at the point of the tube to gain

access to the wire.

3 Using suitable pliers, pull the cutting wire through

the sealant to the outer side of the glass.

4  Secure each end of the braided cutting wire in the

special handles E.


5

Move the cutting wire backwards and forwards in a

sawing motion and at the same time gently push or

pull the wire to cut through the old sealant.


Direct Glazing (cont'd)

Removing the Broken Glass and Old Sealant (cont'd)

c Cut-out Knife F. The cut-out knife can be used as a

left handed or right handed tool. For the knife and its

replaceable blades, refer to Service Tools.

(i) Insert the knife blade into the sealant.

(ii) Make sure that the blade of the knife is against

the glass as shown at G.

(iii) Use the 'pull-handle' to pull the knife along and

cut out the old sealant.

d

Craft Knife H. The blades are replaceable.

(i) Insert the knife blade into the sealant.

(ii) Pull the knife along and cut out the old sealant.

Note: There are other tools available to cut out the old

sealant. For example, there is a long handle type craft knife

to give extended reach. Refer to Service Tools, for details of

this and any other tools.

4  a Laminated glass - lift out the broken pane using

glass lifters (see Service Tools).

b Toughened glass - remove the cut off sealant and all

remaining particles of shattered glass.

5  If necessary, trim off the remaining old sealant to leave

approximately 1 to 2 mm on the upright face of the cab

frame aperture, as shown at J.

Apply a coat of 'Black Primer 206J' to the paintwork if:

a Paintwork was damaged or scratched during the

glass/sealant removal procedures.

b The old sealant was inadvertently cut back to the

cab frame during the glass/sealant removal

procedures.

Preparing the Cab Frame Aperture

1  If damp or wet, dry the aperture area using a hot air gun

(sourced locally).

2  Use 'Active Wipe 205' to thoroughly clean and 'prime'

the trimmed sealant. Use a lint free cloth to apply the

'Active Wipe 205', allow 5 minutes flash off (drying)

time.

Note: Do not use any other type of cleaning fluids, otherwise

they may be absorbed into the old sealant and ultimately

prevent the new glass from bonding.


JCB Agco SISU Power WinEEM4 – JCB Service Tool 2.8.0

2025年8月11日星期一

How to adjust the air conditioning compressor drive belt on a JCB 3CX - 4CX - 214 - 214e - 215 - 217 backhoe loader


1 Park the machine on firm level ground. Raise and block

the loader arms. Lower the backhoe to the ground and

stop the engine.

JCB Electronic Service Tool Diagnostic Kit High Quality

2 Remove the starter key.

06.2025 JCB ServiceMaster 4 v25.3.3 Diagnostic Software with SW Files Download and installatiom

! WARNING

Make sure the engine cannot be started. Disconnect the

battery before doing this job.

2-3-3-5

3 Raise the Bonnet

4  Remove both Side Panels

5  Loosen pivot fastening bolt A. Loosen adjustment link

fastening bolts B and C.

6  Position the compressor so that there is approximately   10 mm (3/8 in) slack at      point X midway along the belt.

7  Tighten bolts A, B and C. Make sure that bolt A is the

last to be tightened.

Note: If a new belt is fitted, check the belt tension after the

first 20 hours of operation.

JCB Agco SISU Power WinEEM4 – JCB Service Tool 2.8.0

2025年7月30日星期三

How do I change the hydraulic system filter on a JCB 3CX - 4CX - 214 - 214e - 215 - 217 backhoe loader?


! WARNING
Fine jets of hydraulic fluid at high pressure can penetrate
the skin. Do not use your fingers to check for hydraulic
fluid leaks. Do not put your face close to suspected
leaks. Hold a piece of cardboard close to suspected
leaks and then inspect the cardboard for signs of
hydraulic fluid. If hydraulic fluid penetrates your skin, get
medical help immediately.

JCB Electronic Service Tool Diagnostic Kit High Quality

1 Position the machine on level ground. Roll the loader
shovel forward and rest it on the ground. Retract the
extending dipper if fitted. Close the backhoe bucket.
Swing in the dipper. Lower the boom until the bucket
rests on the ground. Lower the stabilisers to the
ground. Stop the engine. Remove the starter key.

2 Remove the element assembly
a Remove screws A. Remove the cover plate B and
gasket C
Note: If gasket C is a rubber type it can be reused provided
it is undamaged. If the gasket is a cork type it must be
discarded and a new gasket fitted on assembly.
b Remove spring D.
c Hold handle E and pull the element assembly from
the hydraulic tank.

06.2025 JCB ServiceMaster 4 v25.3.3 Diagnostic Software with SW Files Download and installatiom

3 Remove the element from its canister.
a Hold canister F.
b Hold handle E and rotate the element G 90° anticlockwise.
c Pull on handle E, the element G should separate
from its canister F. Discard the old element.
d Remove and discard seal H.
e Clean the inside of canister F.
New machines are fitted with a 5 micron filter element which
must be replaced at the first 100 hour service with a 10
micron filter element.

4 Fit the new element.
a Fit a new seal H.
b Make sure that seal J is fitted in the new element.
c Push the element G into its canister F and rotate the
element 90° to lock it into position. Check that the
element has locked into position by pulling on
handle E.
d Install the element assembly in the hydraulic tank.
e Fit spring D and gasket C, (see ‘Note’ at step 2).
f Fit cover plate B and tighten screws A to 21 Nm
(15.5 lbf ft).
g Check oil level and replenish as required through
filler. Fit and tighten the filler cap as described on
previous page.

JCB Agco SISU Power WinEEM4 2.9.0 JCB Service Tool Download & Installation Service

2025年7月29日星期二

How to check the oil level and change the oil and filter on a JCB 3CX - 4CX - 214 - 214e - 215 - 217 backhoe loader

Checking the Oil Level 
 
1
Make sure the park brake is engaged and the
transmission set to neutral. Lower the loader arms and
backhoe to the ground, switch OFF the engine and
remove the starter key. 
 
2
Open the bonnet, see Engine Panels, Opening and
Closing the Bonnet. 
 
3
Switch OFF the engine and remove the starter key, fill
the transmission to maximum mark on dipstick/filler A.
Use only the recommended oil. 
 
4
Start and run the engine slowly for a period not
exceeding five minutes. This allows the oil to fill filter,
pump, torque converter, oil cooler and hoses. 
 
5
Switch OFF the engine and remove the starter key, wait
approximately 20 seconds. Check the oil level and if
required, fill to dipstick level.


Changing the Oil and Filter
The transmission oil should be drained through the suction
strainer aperture to flush out any particles which fall off the
strainer during its removal. 
 
! WARNING
Make the machine safe before getting beneath it. Lower
the attachments to the ground; engage the parking
brake; remove the starter key, disconnect the battery.

1
Park the machine on level ground. Engage the parking
brake. Lower the attachments to the ground. Stop the
engine. Remove the starter key. Disconnect the battery. 
 
! CAUTION 
When the strainer is removed, oil will gush out. Keep to
one side when you remove the strainer.

 
2
Place a container, of suitable size beneath the drain
plug. Remove bolts D. Pull out the strainer E and its
gasket F. Allow the oil to drain into the container. 
 
3
Clean the strainer with a suitable solvent. Follow the
solvent manufacturer's instructions on safety. 
 
4
Fit the strainer E and a new gasket F. Apply JCB
Threadlocker and Sealer to bolts D before fitting and
tightening them. Torque tighten the bolts to 10 Nm (7
lbf ft). 
 
5
Unscrew and remove the filter B. Fit the new filter:
5.1 Smear seal C with transmission oil. 
 
5.2 Screw the filter on until it just contacts the filter
head. 
 
5.3 Turn the filter at least another 3/4 of a turn. 
 
 
6
Fill the system with new oil through the dipstick/filler A.
Do not fill past the top mark on the dipstick.
Note: Fit only a genuine supplied JCB filter, otherwise
damage to the system may be incurred through
contamination.
 

JCB Agco SISU Power WinEEM4 2.9.0 JCB Service Tool Download & Installation Service

2025年7月26日星期六

How to check and change the coolant on a JCB 3CX - 4CX - 214 - 214e - 215 - 217 Backhoe Loader

Checking the Coolant
! WARNING
The cooling system is pressurised when the coolant is
hot. Hot coolant will burn you. Make sure the engine is
cool before checking the coolant level or draining the
system.

JCB Electronic Service Tool Diagnostic Kit High Quality


1 Make sure the park brake is engaged and the
transmission set to neutral. Lower the loader arms and
backhoe to the ground, switch OFF the engine and
remove the starter key.
2 Open the bonnet, see Engine Panels, Opening and
Closing the Bonnet.
3 The coolant level should be between the COLD/MIN
and the HOT/MAX marks on coolant reservoir B. Fill
with pre-mixed water/antifreeze if necessary.

Changing the Coolant
! WARNING
The cooling system is pressurised when the coolant is
hot. Hot coolant will burn you. Make sure the engine is
cool before checking the coolant level or draining the
system.


06.2025 JCB ServiceMaster 4 v25.3.3 Diagnostic Software with SW Files Download and installatiom

1
Make sure the park brake is engaged and the
transmission set to neutral. Lower the loader arms and
backhoe to the ground, switch OFF the engine and
remove the starter key.
2
Open the bonnet, see Engine Panels, Opening and
Closing the Bonnet.
3
Carefully loosen cap A. Let any pressure escape.
Remove the cap.
! CAUTION
Keep your face away from the drain hole when removing
the drain plug.

4
Remove drain plug C and let the coolant drain out.
Make sure the drain hole is not blocked.
5
Disconnect the radiator hose at D and allow the coolant
to drain. Flush the system using clean water.
6
Clean and refit plug C. Make sure it is secure.
Reconnect the radiator hose
7
Use the necessary mix of clean, soft water and
antifreeze, see Coolant Mixtures. Fill to the COLD/MIN
level on coolant reservoir B.
8
Start the engine and run at idle to circulate the coolant,
top up with coolant as necessary.
9
Refit the filler cap. Make sure it is tight.
10
Run the engine for a while, to raise the coolant to
working temperature and pressure. Stop the engine.
Check for leaks.
Note: Make sure the cab heater control is in the hot
position. This will ensure the coolant mixture circulates
through the entire cooling system.

JCB Agco SISU Power WinEEM4 – JCB Service Tool 2.8.0

2025年7月25日星期五

How to Changing the Oil and Filter for Jcb 3cx 4cx 214e 214 215 217 Backhoe Loader

 1 Drain the oil when the engine is warm as contaminants
held in suspension will then be drained with the oil.
Park the machine on firm ground.

JCB Electronic Service Tool Diagnostic Kit High Quality

! WARNING
Make the machine safe before getting beneath it. Lower
the attachments to the ground; engage the parking

2 Make sure the park brake is engaged and the
transmission set to neutral. Lower the loader arms and
backhoe to the ground, switch OFF the engine and
remove the starter key.
3 Open the bonnet, see Engine Panels, Opening and
Closing the Bonnet.
4 Drain the oil:

! CAUTION
Oil will gush from the hole when the drain plug is
removed. Hot oil and engine components can burn you.
Keep to one side when you remove the plug.

06.2025 JCB ServiceMaster 4 v25.3.3 Diagnostic Software with SW Files Download and installatiom

a Place a container of suitable size beneath the drain
plug.
b Remove drain plug C and its 'O' ring. Let the oil
drain out, then clean and refit the drain plug with a
new 'O' ring. Tighten to 34 Nm (25 lbf ft).

5 Change the filter:
a Unscrew the filter canister D. Remember that it will
be full of oil.
b Check that adapter G is secure.
c Clean the filter head F.
d Add clean engine lubricating oil to the new filter
canister. Allow enough time for the oil to pass
through the filter element.
e Smear the seal E on the new filter with oil. Screw in
the new filter canister - hand tight only.

6 Fill the engine to the max mark on the dipstick with new
oil through the filler. See Service Capacities and
Lubricants for recommended oil grades. Wipe off any
spilt oil. Check for leaks. Make sure the filler cap is
correctly refitted.
7 Make sure the engine will not start and turn the starter
switch to operate the starter motor until the oil pressure
light is extinguished. (To make sure the engine will not
start, remove the engine shut-off solenoid fuse, housed
in the fuse box).
8 Insert the engine shut-off solenoid fuse and operate the
engine. Check for leaks. When the engine has cooled,
check the oil level.

JCB Agco SISU Power WinEEM4 2.9.0 JCB Service Tool Download & Installation Service

2025年5月20日星期二

How to adjust the JCB loader valve adjustment

 This article explains how to adjust the valve adjustment on a JCB loader


Note: If a new regulator valve is fitted, or a valve stripped, 
 
cleaned and rebuilt, then the pressure spool should be 
 
backed off to a low pressure. This will prevent inadvertent 
 
damage to the pump.
 

Flow Regulator Spool 
 
The pressure in the pump out line (pressure test connector 
 
B) should be 20 bar (290 lbf/in2) greater than the pressure in 
 
the load sense line (pressure test connector A). If not adjust 
 
 
the regulator flow spool as described below: 
 
1
Lower the backhoe bucket and loader shovel to rest on
the ground; stop the engine; operate the control levers
to vent residual hydraulic pressure. 
 
2
Gain access to the regulator valve assembly (mounted
on the pump). 
 
3
Remove cap C and loosen locknut D
 
4
Turn adjusting screw E clockwise to increase pressure
setting and anti-clockwise to decrease setting. 
 
5
Repeat pressure test as detailed previously and
establish valve is set correctly. 
 
6
Tighten locknut, refit cap


This article explains how to adjust the wear pads of the extended bucket of a JCB backhoe loader

  Preparing the Cab Frame Aperture 1  If damp or wet, dry the aperture area using a hot air gun (sourced locally). 2  Use 'Active Wipe 2...