Preparing the Cab Frame Aperture
1 If damp or wet, dry the aperture area using a hot air gun
(sourced locally).
2 Use 'Active Wipe 205' to thoroughly clean and 'prime'
the trimmed sealant. Use a lint free cloth to apply the
'Active Wipe 205', allow 5 minutes flash off (drying)
time.
Note: Do not use any other type of cleaning fluids, otherwise
they may be absorbed into the old sealant and ultimately
prevent the new glass from bonding.
Direct Glazing (cont'd)
Preparing the New Glass
JCB Electronic Service Tool Diagnostic Kit High Quality
! CAUTION
The laminated front screen must be handled with extra
care to prevent breakage. Wherever possible, store and
handle it in a vertical attitude. When placing or lifting the
screen in a horizontal attitude it must be supported over
its whole area, not just at the edges.
BF 1-8
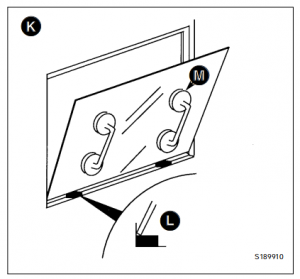
1 Make sure that the new glass correctly fits the frame
aperture K.
a Put two spacer blocks L onto the bottom part of the
frame aperture.
b Install the new glass on the spacer blocks - ALWAYS
USE GLASS LIFTERS M (see Service Tools). Check
that there is an equal sized gap all round the edge of
the glass.
Note: The spacer blocks are rectangular in section to give
two common gap widths. If necessary they can be trimmed
to a smaller size to give an equal sized gap around the glass.
IMPORTANT: The glass edges MUST NOT touch the frame,
otherwise movement of the frame will chip and eventually
break the newly installed glass.
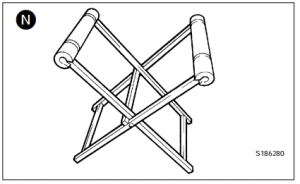
2 After checking for size, remove the new glass and place
it on a purpose made glass stand N (see Service
Tools).
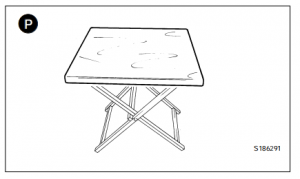
Small panes of glass will need locating on a 600 x 700 mm x
15 to 19 mm thick plywood board P (sourced locally to fit
the glass stand N). It is recommended that an access hole is
cut in the board to accommodate the glass lifter, making it
easier and safer to handle small panes of glass. The board
should be covered with felt or carpet to give an anti-scratch
surface. Resting the glass on four spacer blocks will ensure
clearance of the cartridge nozzle tip during application of the
polyurethane sealant.
3 Make sure the glass is positioned on the stand the
correct way up (i.e. with the black ceramic ink band
upwards) ready for application of primer etc.
4 a Use 'Active Wipe 205' to thoroughly clean and
'prime' the black ceramic ink band printed on the
glass (see Note 1). Use a lint free cloth to apply the
'Active Wipe 205', allow 5 minutes flash off (drying)
time.
Note 1: Do not touch the glass after cleaning with the
'Active Wipe 205'.
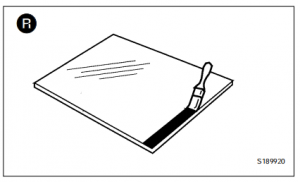
b If the glass does not have a black ceramic ink band,
paint a band on the glass using 'Black Primer 206J'.
The band should be approximately 25mm (1in) wide,
and the edge should be a neat straight line as shown
at R
06.2025 JCB ServiceMaster 4 v25.3.3 Diagnostic Software with SW Files Download and installatiom
Direct Glazing (cont'd)
Preparing the New Glass (cont'd)
5 Install the Ultra Fast Adhesive cartridge (see Sealing
and Retaining Compounds and Note 2 below) into a
suitable applicator gun:
a Remove the aluminium disc cover from the base of
the cartridge and discard the 'dessicant capsule'.
b Make sure that the rolled edge of the cartridge is not
damaged - if necessary, the edges should be
pressed flat, otherwise it will be difficult to remove
the cartridge from the applicator gun.
c Pierce the front 'nozzle' end of the cartridge to its
maximum diameter.
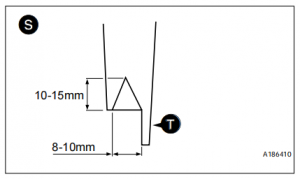
d Fit the pre-cut nozzle shown at S.
e Install the cartridge in the applicator gun.
Note 2: Cold material will be very difficult to extrude. The
cartridges must be pre-heated in a special oven (see
Service Tools) for 1 hour to a temperature of 80°C (176°F).
Pre-heating the cartridges makes the adhesive more
workable and also brings the 'curing' time down to 30
minutes.
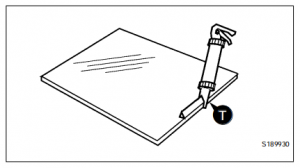
6 Apply the pre-heated adhesive to the glass (do not start
in a corner). Keep the nozzle guide T against the edge
of the glass and make sure that the adhesive forms a
continuous 'pyramid' shape.
Note 3: Once the pre-heated adhesive has been applied to
the glass, install the glass in the aperture as soon as
possible. After approximately 10 minutes the sealant will
form a 'skin', this will prevent the glass from bonding.
7 After applying the adhesive, leave a small amount of
sealant protruding from the nozzle. This will prevent any
adhesive left in the cartridge from 'curing'.
Installing the New Glass
1 Make sure the two spacer blocks are in position (see
step 1 of Preparing the New Glass).
2 Install the glass in the frame aperture:
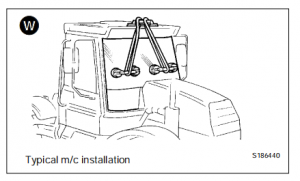
a ALWAYS use the special lifting tools when moving
the glass. Use a lifting strap to hold large panes of
glass in position as shown W.
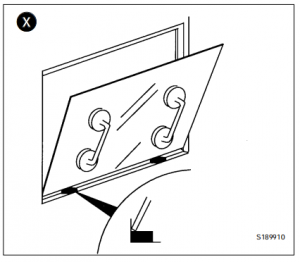
b Sit the bottom edge of the glass on the spacer
blocks as shown X.
c Make sure that the glass is correctly positioned, then
gently press around the edges of the glass and
ensure full adhesive contact is achieved. Do not
press too hard or too much adhesive will squeeze
out.
Direct Glazing (cont'd)
Installing the New Glass (cont'd)
3 Make the inside seal smooth:
a Wearing surgical gloves, dip your finger in a soapy
water solution.
b Use your finger to make the inside seal smooth.
4 All exposed edges must be sealed using Black
Polyurethane Sealant (see Sealing and Retaining
Compounds).
5 Clean the glass after installation:
IMPORTANT: Use extreme caution when wiping the inside
of the new glass - pushing too hard on the inside of the
glass will affect the integrity of the bonded seal.
a Small amounts of sealant can be cleaned from the
glass using the 'Active Wipe 205'.
b Large amounts of excess sealant should be left to
'cure' (see Note 4) and then cut off with a sharp
knife.
Note 4: On completion of the glass replacement procedures,
the sealant 'curing' time is 30 minutes. This means that the
machine can be driven and used after 30 minutes, but it
MUST NOT be used during the curing period of 30 minutes.
c Clean the glass using a purpose made glass
cleaner.
6 On completion of the glass installation procedures tidy
the work area:
a Remove ALL broken glass from the cab area.
b Remove the protective covers from the cab seat and
control pedestals.
c Renew all 'warning' and 'information' decals so that
the new installation conforms with the original cab
installation.


没有评论:
发表评论